
Since these seem to be somewhat of a common failure, I thought I would post steps on how to replace it. The most obvious sign of failure is the warning message in your instrument cluster that there is an oil warning sensor malfunction, but additional symptoms are the oil temp gauge not working and/or the car telling you to add oil when in-fact the correct amount is present.
It's a fairly straightforward job, and can be done WITHOUT draining the oil as long as your oil level is not overfilled. You definitely want the engine to be completely cold, as you are working around the oil tank and exhaust.
You'll need a slotted and phillips head screwdriver, a t30 torx socket and 1/4 inch ratchet, and a t30 screwdriver. Some 1/4 wobble extensions will help as well.
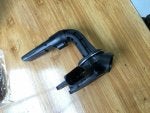
The replacement sender is part number 420907660, if can be obtained for ~150$ for online parts houses (I use genuineaudiparts.com out of San Diego).
First, remove the airbox cover, filters & mafs, and lower airbox.
![]()
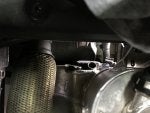
Next, you need to remove the head shield between the oil tank the the exhaust. There is on t30 screw into the oil tank, and 2 underneath the exhaust flex joint. Since you can't see the ones under the exhaust, they aren't necessarily easy to remove. I used a t30 socket and 1/4 ratchet on the rear most screw (operated the ratchet below the flex joint) and the same setup with a wobble extension on the forward bolt (operated the ratchet above the flex joint). There are also flat washers that may or may not stick to the heat shield, so be careful not to lose them when removed the screw.
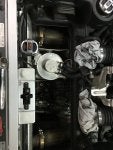
Now, locate the sender at the front of the oil tank. You can see the top of it here with the circular ridge. It is held in place with 2 t30 screws. I was able to remove them using the t30 socket and ratchet. The sender can be dislodged at this point, but you will notice the transmission mount is preventing it from being fully removed. The oil level should be below the hole for the sender, but just in case, it probably a good idea to wedge a rag below the sender in case any oil does dribble out.
![]()
To gain more wiggle room, remove the 2 t30 bolts securing the top of the oil tank. You can then pull the tank to the rear driver (US) corner of the car, which will give you enough wiggle room to rotate the sender and get it out of the tank.
![]()
Once the old unit is removed, coat the o ring on the new unit with oil, clean the mating surface on the tank, and then follow the removal procedure in reverse to get it in to the tank, seat the sender and o-ring by hand, then insert and tighten the 2 retaining screws. After that re-install the heat shield, the airbox filter and maf assembly.
Ideally at this point, you would change the oil, but if you clean area around the sender before removing it, there is little chance to get debris into the tank while exchanging sensors.
If changing your own is something with you are comfortable with, you should have no problem doing this, and it shouldn't take more then an hour (with a lot of that trying to remove and re-install the screws hidden by the flex joint). I'm not sure what the dealer would charge for this, but I imagine it's a lot more the 150$.
![]()
It's a fairly straightforward job, and can be done WITHOUT draining the oil as long as your oil level is not overfilled. You definitely want the engine to be completely cold, as you are working around the oil tank and exhaust.
You'll need a slotted and phillips head screwdriver, a t30 torx socket and 1/4 inch ratchet, and a t30 screwdriver. Some 1/4 wobble extensions will help as well.
The replacement sender is part number 420907660, if can be obtained for ~150$ for online parts houses (I use genuineaudiparts.com out of San Diego).
First, remove the airbox cover, filters & mafs, and lower airbox.
Next, you need to remove the head shield between the oil tank the the exhaust. There is on t30 screw into the oil tank, and 2 underneath the exhaust flex joint. Since you can't see the ones under the exhaust, they aren't necessarily easy to remove. I used a t30 socket and 1/4 ratchet on the rear most screw (operated the ratchet below the flex joint) and the same setup with a wobble extension on the forward bolt (operated the ratchet above the flex joint). There are also flat washers that may or may not stick to the heat shield, so be careful not to lose them when removed the screw.
Now, locate the sender at the front of the oil tank. You can see the top of it here with the circular ridge. It is held in place with 2 t30 screws. I was able to remove them using the t30 socket and ratchet. The sender can be dislodged at this point, but you will notice the transmission mount is preventing it from being fully removed. The oil level should be below the hole for the sender, but just in case, it probably a good idea to wedge a rag below the sender in case any oil does dribble out.
To gain more wiggle room, remove the 2 t30 bolts securing the top of the oil tank. You can then pull the tank to the rear driver (US) corner of the car, which will give you enough wiggle room to rotate the sender and get it out of the tank.

Once the old unit is removed, coat the o ring on the new unit with oil, clean the mating surface on the tank, and then follow the removal procedure in reverse to get it in to the tank, seat the sender and o-ring by hand, then insert and tighten the 2 retaining screws. After that re-install the heat shield, the airbox filter and maf assembly.
Ideally at this point, you would change the oil, but if you clean area around the sender before removing it, there is little chance to get debris into the tank while exchanging sensors.
If changing your own is something with you are comfortable with, you should have no problem doing this, and it shouldn't take more then an hour (with a lot of that trying to remove and re-install the screws hidden by the flex joint). I'm not sure what the dealer would charge for this, but I imagine it's a lot more the 150$.